Tag Archives: organization

Garage Organization Ideas for Under $50

By: Jan Soults Walker

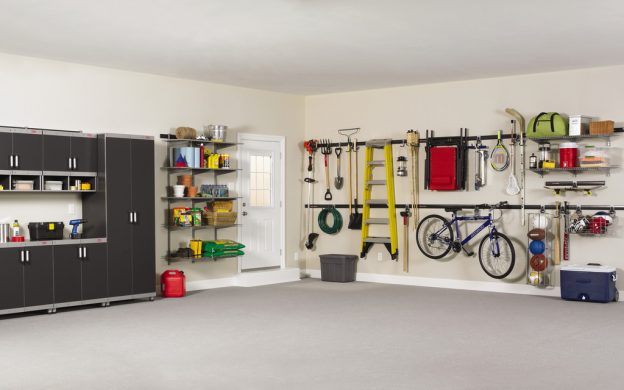
If clutter trumps cars in your garage, get organized (and make room for your vehicles) with these smart garage storage solutions, each costing less than $50.

Bikes, Skates, and Other Wheels

Bicycles, skateboards, scooters, and rollerblades – wheeled belongings can get underfoot and land you on your assets or bang up the car. Protect your paint job (not to mention your backside) with these wily storage solutions for your garage.

  • Hoist bicycles to the rafters with a rope-and-pulley system (starting around $40) that makes it easy to raise the bike and lock safely in place. When you’re ready to ride, release the lock and lower your bike to the garage floor. You’ll need an hour or two and basic tools to secure the pair of pulleys to ceiling joists and thread the ropes. (Similar hoists are available for kayaks or small boats; starting around $25.)
  • Avoid unintentional skateboard “tricks” with a specially designed wall rack that makes it easy for kids to hang up helmets and skateboards together; starting around $20. Secure this one to wall joists in less than an hour.
  • Keep scooters and bikes out of the way with tool hooks installed on a length of 1-by-6-inch lumber. You’ll pay $3 for each pair of vinyl-coated screw-in tool hooks and $1 per foot for lumber. You’ll need only an hour or two to secure the lumber to wall joists and screw the hooks into place along the board.

Sporting Goods

Active pursuits require a lot of gear that ends up in the garage. These organizers help tidy up all those sports balls, rackets, bats, gloves, clubs, fishing rods, and other outdoor fun-related goodies.

  • Bring together balls and bats on a convenient wire rack equipped with hangers that hold gloves too; starting around $35.
  • To keep your garage organization from going downhill, stash two pairs of snow skis, poles, and boots in one handy steel ski rack; $45. Securing this rack to wall studs helps it hold the weight of the equipment. If you can’t position it on studs, use wall anchors for a secure installation. You can do the task with or without anchors in an hour or two.
  • Make a port for your fishing rods by suspending two wire shelves from your garage ceiling about 5 feet apart, then threading the rods through the openings. Use shelves left over from a project or purchase a 4-foot-by-16-inch vinyl-coated wire shelf for less than $9, and saw it in half crosswise (or clip with bolt cutters) to make two 2-foot shelves. Snip additional wires where you need wider slots to accept pole handles or reels.

Tools

With a little imagination, you won’t need specially designed storage to organize your tools.

  • Conveniently hang wrenches and bungee cords using an ordinary vinyl-coated wire tie-and-belt rack, available at big box stores; $8.
  • Metal tools cling to a magnetized rail, keeping items in view and easy to retrieve; starting around $30. Simply screw the rail to wall studs to safely hold the weight of the tools (it’s an idea you may be drawn to.)
  • Cushion and protect tools by padding your toolbox drawers with a soft, non-slip liner. The open-weave design keeps moisture away and prevents tools from rolling around. Enough material to line eight average-size drawers is $15. Just cut the liner to length to fit and slip it into the drawer.
  • Organize small items – such as pencils, box cutters, and tape measures – by stashing them in electrical junction boxes; about $2 each (free if you have spares). Purchase a variety of sizes and shapes and secure them to studs or pegboard.

Yard and Garden Gear

Rakes, ladders, clippers, shovels, and sprays – a host of supplies keep your yard and garden looking lush and well-cared-for, but your garage? Not so much. Keep your garden and landscaping tools organized with these novel storage solutions.

  • Transform an old cabinet into a nifty garage storage unit on wheels. Hunt down an old four-drawer filing cabinet for a few dollars at a garage sale. Remove the drawers, turn it on its backside, and use a couple afternoons to apply paint and pegboard sides. Less than $25.
  • Hold heavy tools, long-handled implements, ladders, and more. Long steel rails with extruded holes mount high on the garage wall and secure to studs. Arrange a series of hooks and pegs on the rail to hang big tools. Two 48-inch rails sell for $22.
  • Secure a wooden pallet to wall studs to create a pocket for holding long-handled garden tools. To find free wooden pallets, check with local businesses as well as online classifieds, such as Craigslist. Cost: Free.
  • Keep bottles of fertilizers, repellants, and lubricants upright and easy to retrieve. A can rack ($15) prevents cans and bottles from tumbling off shelves.

Visit HouseLogic.com for more articles like this. Reprinted from HouseLogic.com with permission of the NATIONAL ASSOCIATION OF REALTORS®.

Featured Image Source: “Rubbermaid FastTrack Garage Organization System” by Rubbermaid Products © 2011 (CC BY 2.0)

Four Days to a Clutter-Free Home

Life is crazy. With all the chaos that comes from constantly being on the go, our homes can become a disaster. On the days you might have a little time to yourself, you are too tired to care that every surface of your home is piled with papers and junk. Yay adulthood. It is time to take control of that clutter! All you need is one hour a day, for five days, and your home will be organized! Throughout the article you will notice I included steps which require you to purchase something, this is not necessary, but can be very helpful! Make sure to read through all the steps before you start, especially step four!


Flickr Creative Commons: Emily May

Flickr Creative Commons: Emily May


Day 1:

Let’s start in the bedroom – the place you begin and end each day. First, identify your biggest problem area. For some people, it is the closet, for others, it’s their bedroom floor. Or maybe it is everywhere? Well, the first step for every room is to get rid of everything you do not need. This process can be difficult, but after the stuff is gone, you will feel liberated. There are so many things cluttering our homes that we use less than once a year. You do not need these items, and you will not miss them. Keep telling yourself that.

Never underestimate the power of making your bed. This should be the first step to organizing a bedroom. It will set the tone of the room, and give a space to lay things out if you need to.

Now get two bags or bins, make a throw away pile, and a donate pile. If you feel it’s necessary, you could also have a ‘sell’ or ‘maybe’ pile. Go through your closet, your dresser, under your bed, everywhere. Anything you have not used in six months goes into one of your bins. (Unless you live in a state like Minnesota where your clothing depends heavily on the weather – just because you haven’t worn your winter coat in six months does not mean you should chuck it out).

This step cannot be stressed enough. You do not need twenty three sweatshirts, especially if fifteen of them are from high school. You also do not need those hair scrunchies from 1985. Or all those old issues of your favorite magazine.

Spend twenty minutes on this task. If you have a lot of excess, maybe thirty minutes. Hopefully after this, your room will already look better.

Now that all the extra stuff is gone, put things you are keeping where they belong. No more clothes on the floor, no more books on your nightstand, no more towels over your bed posts.. you get the idea.

Once you have everything where it belongs, the space will feel much better, and you will be more motivated to put things back where they go in the future. To make it easier on yourself, invest in organizational furniture, like a bookshelf, hooks for towels, a storage chest, or shelving units. If you have a convenient place to put your books, scarves, etc, you are more likely to put it back where it belongs. To save money, go to thrift stores and consignment stores to get these items. The dollar store also sells small bins and hooks for a good price. 3M hooks are also a major space saver. They can be used to hang coats, purses, jewelry, and towels.

Need help organizing that closet? Here are some awesome solutions.


Flickr Creative Commons: zhelen

Flickr Creative Commons: zhelen


Day 2:

Now for the living room. This is probably the room with the most clutter of any. The first step again is to get rid of all the extra stuff. A lot of the stuff in living rooms doesn’t belong in there – old newspapers, dirty cups and bowls, a craft project, a ukelele.. all sorts of items end up in our living room. Again make a donate pile and a throw away pile. Get rid of everything you do not use, and put things like dishes away where they belong.

Okay so you got rid of things that do not need to be in your living room, but what to do with all the things that still go there? Most people have at least three remotes, a couple blankets, and if you have kids.. let’s not even get started with the amount of stuff in your living room. The best solution for your living room is some sort of bin system. Ideally, the shelf with all the square cubbies each containing a basket, you know the one? Those rock. Each kid can get their own basket or two to keep stuff in, another basket can be for blankets, another for dog toys, etc. However those shelves can take up a lot of space and actually be expensive. Instead, integrate organization into functional furniture. An ottoman that opens up is great for keeping blankets and photo albums. A coffee table with built in drawers is also useful.

If you go with an ottoman or coffee table that opens up, it is helpful to use small storage bins inside to keep everything organized. One container for Legos, another for batteries, etc.

Another option is a desk or hutch, either against a wall, or along the back of a couch. This provides a surface for plants or lamps, and the drawers provide extra storage. If you choose a desk without any drawers, you can place baskets or bins in the space underneath.

3M velcro strips can also be a useful tool to keep remotes and game controllers in place inside a drawer or cupboard.

For inspiration, this BH&G article has some really great ideas for storage ideas.


Flickr Creative Commons: ramsey beyer

Flickr Creative Commons: ramsey beyer


Day 3:
Kitchen! Okay the first step can be tough on your nose. Go through your fridge and cupboards. Get rid of all moldy Tupperware, expired foods, and stale cereal. Doing this once a month can really surprise you! Most people have at least two or three containers they forgot about in their fridge.

Now scan your counter tops for anything that doesn’t belong in the kitchen. Keys, dirty dishes, mail, and whatever else shouldn’t be there. If you don’t have a dishwasher, put away all the clean dishes in your drying rack. Put dirty rags and towels in the laundry bin. Wipe away crumbs and juice spills.

You kitchen appears to be organized now. Open those cupboards, still look clean? Who designed cupboards to be shaped the way they are? Nothing seems to fit in them the right way. This is where 3M hooks and other hardware really come in handy.

Here is a great resource for ways to organize your kitchen cupboards!


Flickr Creative Commons: Gerry Dincher

Flickr Creative Commons: Gerry Dincher


Day 4:

Day four is reserved for bringing all your donated items to the thrift store, and for implementing whichever hooks, shelves, bins, and other furniture you have decided on. Use this day to add the finishing touches to the organization of each room, and also to see areas that have already become chaotic since you de-cluttered it just days ago.

Please send us your ‘before and after’ photos! We might even feature you in our next blog post, or on any of our various social media sites!